About that Wedding Cake …

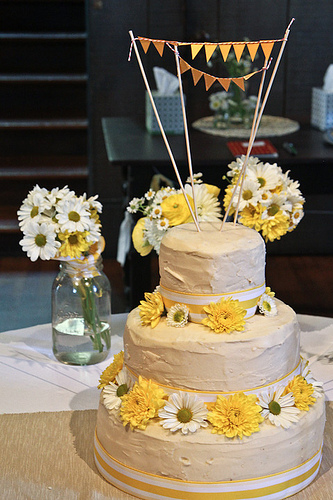
[Cake for Leah and Simon, gorgeous photo by Sweet Monday Photography.]
A year ago I was obsessing about butter cream — how much, would it hold up to the heat and humidity of a Maine summer, what kind of vanilla, should I make strawberry jam for the filling for the 1-2-3-4 cake instead of blueberry (nixed, and rightfully so, because Maine is known for its wild blueberries and I’m nothing if not a person who tries to have things make sense), whether or not I should bring San Francisco/local cocoa powder with me in a nod to the groom [my bro]’s Northern California roots, would incorporating chocolate in general be a bad idea because there was going to be a white dress involved …. ?
Yep. All of that. It kept me up at night and gave me the occasional nightmare and had me mildly biting my fingertips for months because, YES, a wedding cake is important, and EVEN THOUGH you’ve baked and baked and baked your little heart out for years and years and have plenty of experience, you just never know what can happen. The cake could fall. The dowels might not hold. The flowers might wilt after you use them to decorate. You could forget a key ingredient and the lemon curd could turn out mouth-puckeringly sour (my worst nightmare of all). The guests might not be hungry because they’d eaten a lot at dinner. I could trip carrying the cake from kitchen to table. A rainstorm could fill the river to bursting and it would flood the banks all the way up to the reception building and sweep it away …. .
Happily, all my fretting was for naught. I arrived in June armed to bake and quickly set to it. Thus ensued many hours of mixing, whipping, stirring, sifting, egg-cracking, and smoothing, all whiled away quite pleasantly in my sister-in-law’s spacious teaching kitchen (she teaches culinary arts classes at the vocational high school in the town where they live), the time broken up by visits from friends and family. All the ingredients were assembled for me before I even arrived; all I had to do was to call in a request for “another carton of eggs, please” when I realized I’d miscalculated. I had lunch and coffee brought to me intermittently, had access to multiple stand-up mixers (what luxury!), hugely gorgeous convection ovens, all the trays and pans and utensils I could ever wish for, and, the best part, a walk-in fridge and freezer. And lo and behold, the dowels held, the buttercream didn’t melt, the flowers were beautiful, and people ate and ate.
It was absolutely astonishing. After it was all over I took a large chunk home with me on the plane and felt a little wistful that it was over. It was a bit of work, sure, but there was something so satisfying about it. If I live (partly) to cook, I even more than that live to feed.
[Cake, decorated, April 2011. Photo via camelsandchocolate.com.]
So when Leah emailed me about three weeks before her wedding and asked if I could bake her wedding cake, I immediately wrote her back replying that I would (I hope I was fairly decorous in my response; internally I was crowing Yes! Yes! Wheee! Another wedding cake to bake! Yes, I am nuts.). We quickly settled on a chocolate cake filled with chocolate ganache and frosted with buttercream — similar one of the cakes that I’d made for Kurt and Emily’s wedding last year (I made two because I was also nervous about having ‘enough.’ See previous comment about ‘nuts’.) — in three 6-inch, 9-inch, and 12-inch rounds. I was again nervous about having ‘enough’ (note: I think ‘enough’ to me means copious amounts of leftovers, which foreshadows my own event coming up in, gulp, five months. Much cake will be had by all, and I mean that sincerely.) and erred on the side of too much; well, can you ever really have too much? I don’t know.
Now, as I mentioned before, I baked Leah (and Simon’s) cake in my own kitchen in San Francisco. This means means of course that I had to gather all the ingredients myself (the horror!), no-one fetched me coffee and lunch, no-one stopped by for chats, I didn’t have access to all of those lovely things like the convection oven, the fridge/freezer, a dishwasher (sob!), etc. etc. And yet I was strangely calm. It all turned out fine! My oven is small and probably couldn’t fit more than a 14-inch round cake pan — but I only needed to bake a 12-inch. I am terribly lacking in counter space — but I really only used a couple of bowls per batch of batter (well, plus a few pots and a bowl to melt/temper the chocolate. Anyway.) I certainly wished I’d had a dishwasher, but it’s somehow gratifying to marshall all your cooking equipment back into shape after putting it to a good workout, no matter how tired you might be. And the lack of a standing mixer? Here’s a secret: I actually prefer a hand mixer because it allows me more control and to really feel, for example, the buttercream come together into the consistency I know is just right. Shhhhh.
Since this was my second go-round at baking a wedding cake, I thought I’d share a bit of my experience in hopes of enticing you to attempt it yourself — or maybe just to bake that cake you’ve been wanting to try for ages yet feel intimidated by. Let me share another secret: baking is fun. It really is! And it’s not that difficult! Pick a reliable recipe (maybe one that’s been recommended to you by a trusted source, or ask a frequently-baking friend) and stick to it. I cannot stress this enough. I typically go ‘off book’ when I cook dinner, but for baking, I mostly trust the tried-and-trues. Once you’re more comfortable you can get more adventurous but for starting out: follow the instructions.
So: the wedding cake. I knew had a very small space in which to work and so I figured out how to maximize what I had. The dining table doubled as a cooling station and later as the main headquarters for slicing, filling, and frosting. I tried to limit the amount of bowls I dirtied (think use one, wash, and re-use rather than piling up a stack in your — tiny — sink which is both daunting and exhausting) and emptied out my freezer and refrigerator as much as possible the week before I made the cake (surprisingly, all the layers fit with room to spare — which says something about small apartment appliances!). I figured out how many batches I’d need to make (four) and then figured out the quantity of ingredients I’d need. I made just two (!) trips to two different stores and assembled them within an hour.
Then I mapped out a baking schedule. I baked the 6-inch rounds and the 9-inch rounds one night and baked the 12- inch rounds the next. What I’ve learned from experience is that it’s best to bake in advance, pop in the freezer for a day or two until you’re ready to fill and frost, then let thaw in the fridge overnight. This makes the texture perfect for cutting — no crumbly mess or wasted bits. Cake is surprisingly sturdy and can take being hauled around a bit, though you don’t want to do so when it’s very fresh. Doing things in advance also allows for rookie mistakes, for example, wondering if you forgot to add the cocoa powder to a batch of batter (Ahem. I blame fatigue. Though my coworkers and book club didn’t seem to mind the possibly cocoa-less cake, I baked another round just to be sure. Don’t be like me, OK?)
Two days before the wedding, I made an enormous batch of dark chocolate ganache with organic (and delicious) chocolate chips from my neighborhood market and organic Clover cream. While it cooled, I cut the cake layers and brushed them liberally with sugar syrup; this helps the cake taste wonderfully tender when it’s served. I also made about … six? Seven? Batches of simple vanilla buttercream with Clover butter — using a good-tasting butter is key, though if you can’t swing it, it’s OK. I’m sort of fanatical about dairy since I don’t use too much of it, and so I always try to get local(ish), organic stuff. I do think it makes a difference, especially when you’re going to really taste it, like you do in buttercream. Then I did the crumb coat which results in the cake looking like so:
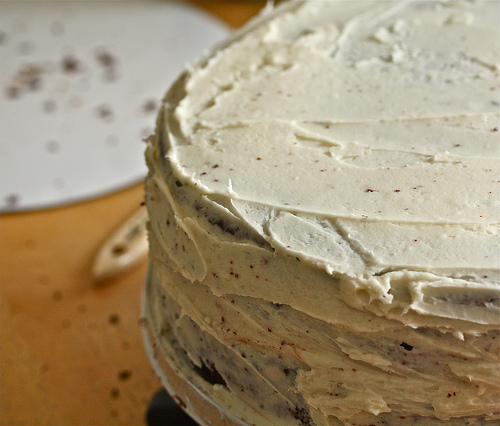
[Cake, crumbed, April 2011.]
which is an essential step, and not just for wedding cakes. A crumb coat is a light layer of butter cream that’s slathered over the cake to protect the final layer of buttercream from unsightly crumbs (unless you like crumbs; in that case — skip it!) Then you put the cake back in the fridge to set for about 10-15 minutes, depending on how cold your fridge is, and then finally frost it all liberally with buttercream, using an offset spatula and a turning cake stand to make it as smooth as possible. This is one of the tiers post-crumb coat and final layer of butter cream:
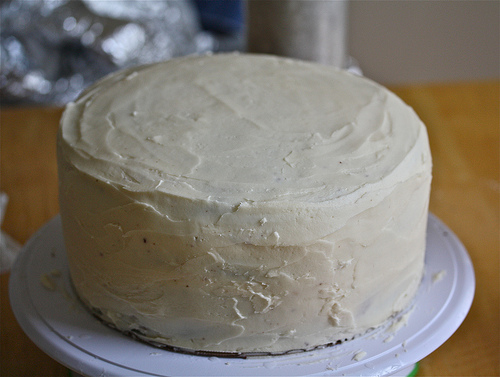
[Nearly done, April 2011.]
Actually, now that I look at this it probably wasn’t the final incarnation of the cake, because I probably obsessively kept smoothing it (although, since I’m not a professional, it was nearly impossible, whinge). I did this with all the cake rounds, let them rest and recover overnight, and then handed them off to Kristin and Scott the next morning, crossing my fingers all would be well (it was).
The main takeaways from this is that I hope to impart to you is: it is entirely possible to create a major baking project in your home kitchen, no matter what size it is (well — maybe not the kitchen Kurt and Emily had in Greece) or how much time you have (did I mention that the day I did the filling and frosting much furniture was moved into my apartment, and then I went to a concert in Berkeley, and then the next day there was more moving, and baking, and a trip up north? Um, yeah.) — i.e., you don’t need to quit your job to do this. What you do need is a bit of perseverance, positive energy and faith. Come to think of it, you probably need those for marriage as well. Take heart and be of good cheer! And make your baking soda/powder is fresh, and you have a lot of coffee in your system before you begin.
You also need:
reliable recipes (test, test, test! Your coworkers will be happy to help you out with this.)
proper cake pans, preferably two of each (though I made do with just one 12-inch) in the sizes you need. Wilton is a good brand for this and many other cake-baking needs.)
cardboard cake rounds (to serve as a base for each layer, which is basically an entire cake, and to bolster against damage)
cake strips (to ensure the cake/s are level – this sounds silly, but it really works)
a timer (I’m embarrassingly bad at not always being precise, but in this case I made a concerted effort)
cooling racks (something else that might seem inessential — it did to me — but actually you want all parts of the cake to cool at the same rate. I’m now a convert.)
turning cake stand (INVALUABLE for cutting the layers and for frosting evenly
off-set spatula (for frosting, it really makes a difference, both in appearance and for your sanity)
a cake base (again, I used Wilton, just a simple silver flat base)
wooden dowels or plastic rods (cut to size and inserted into the bottom layer and then middle layers. These provide support for the heavy cake layers when they’re stacked on top of each other.)
a book! (Or at least Internet searching. Even if you have no qualms about taking on this project, it’s a comfort to read how others did it and simply looking at many homemade wedding cakes will give you confidence that yes, indeed, you can absolutely do this.)
and to that end: accept that your cake might look absolutely polished/professional. It’s OK. Do your best, and everyone will oooh and aaah, and the little imperfections? Probably they’re the most glaringly obvious thing to you, but others will hardly notice. Also — make it taste good and any buttercream mishaps will instantly be forgiven.
See?
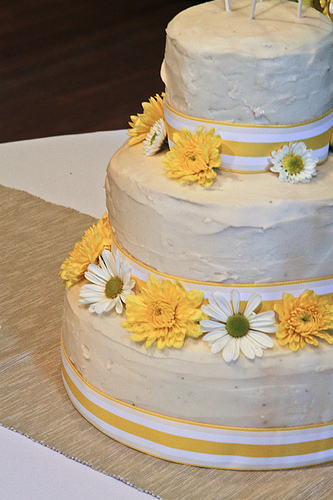
[Cake, decorated, via camelsandchocolate.com.]
A year ago right now I hadn’t baked a wedding cake in my life. As of this writing, I’ve baked three — two in Maine, one in California — and under completely difference circumstances. They didn’t look perfect, of course, because I still need to take that cake-baking class I’ve been meaning to sign up for for … years now, but each tasted delicious. Most important — each was baked with love and good wishes. I suppose all of my cakes are.
And so I keep on baking and making because it just seems to be What I Do. I love it all — the planning part, the process, the deciding on what flavor/s, the gathering up of ingredients, the getting covered in chocolate part, the forgetting to take photos because I’m too intent on getting the butter cream just as smooth as I can humanly get it.
I can’t wait to do another.
Recipes:
Alice Waters’ chocolate cake
Chocolate ganache
Vanilla butter cream
Questions? Need advice? Email me or comment!
Wow, this cake looks fantastic! So beautiful! Thanks for sharing :)
loving these cake details! So pretty!
WOW. that is one amazing cake! i’ve always been too daunted to try my hand at a celebration cake – always just put it in the “too hard” basket. but your words and your enthusiasm might have just inspired me! now, i’m off to find that recipe…
the wedding cakes look beautiful! good job :)
I love this. We obviously found the perfect person to bake our cake, as its creation actually reminds me a whole lot about not just the way the wedding came together but the way WE came together, as a family and as a couple. I have more to say about this, oh yes. (Blog post!) :)