Honey Lemon Curd
This beautiful honey lemon curd recipe takes bright lemons and sweetens them with delicately floral honey for a new take on a classic recipe. Spread it on cakes, toast, or whatever you can think of.

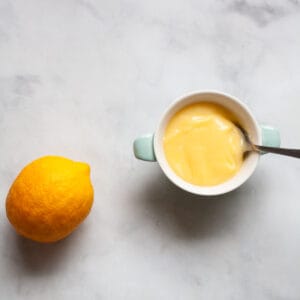
Homemade Honey Lemon Curd Recipe
I love the bright, tangy sweetness of lemon curd and make it often to tuck into cake and buttercream, or I’ll use it to dress up pancakes or dollop on muffins. This honey lemon curd recipe swaps the sugar for honey with wonderful results. Honey and lemon go so well together, and you’ll love how the curd is just sweet enough. The texture of lemon curd is also a highlight, silky smooth and rich, perfect for sipping from a spoon, too.
All the Details
There are a lot of high points in honey lemon curd, with the first being its amazing flavor! Think tart lemon balanced by mellow, sweet honey and you’ll have a good idea of why you’ll want to keep this recipe handy. A few more items of interest:
- That texture: Done right, honey lemon curd will have the smoothest, silkiest texture that’s so lush and luxurious.
- Versatile: This lemon curd will instantly elevate even the most simple of bakes with a punch of flavor.
- Simple: You need just 4 ingredients to make this recipe!

What Is Lemon Curd
Lemon curd is a buttery, creamy spread that combines eggs (often, egg yolks, although this recipe uses the whole egg), lemon juice, sweetener, and butter to make a jam-like substance. It’s the perfect blend of tart-sweet and is wonderful on scones, biscuits, waffles, in or on cakes, and more.

Ingredients Needed
- Eggs – Many recipes call for egg yolks but in this recipe you can keep it easy and use the whole egg.
- Honey – This goes without saying, but use pure honey, local if possible, in this curd.
- Lemon juice – Use freshly squeezed lemon juice. I do not like Meyer lemons for this recipe because I do not find them to be tart enough.
- Butter – Unsalted butter is best so that the salt doesn’t compete with the other flavors going on in the recipe.
Method for Making Honey Lemon Curd
You can get an idea of how to make this honey lemon curd recipe below. I’ve included the detailed instructions in the recipe card lower down.


- Whisk ingredients: In a stainless steel bowl placed over a saucepan of simmering water, whisk together the eggs, honey, and lemon juice.
- Cook: Stir constantly and cook for 10 minutes.


- Strain: Pour the mixture through a strainer.
- Place in a bowl: Then place it in a bowl.


- Add butter: Whisk in the butter.
- Cool: The lemon curd will continue to thicken as it cools.

Ways to Use Homemade Honey Lemon Curd
The question might be, how CAN’T you use honey lemon curd? It is delicious simply spread on toast, on biscuits, added to cake, and more. Here are a few of my favorite ways to add honey lemon curd to my daily life:
- On pancakes: Dress up your Saturday morning pancakes with a soft spoonful of honey lemon curd.
- With waffles: Same idea – drape your oat flour waffles or gluten free waffles for two with a generous helping of lemon curd.
- With cake: In or on the cake, it’s up to you! I’ve always included lemon curd in my wedding cake bakes because it creates such a fantastic flavor contrast with the sweet white cake and jam I invariably tuck between the layers. Or, top a vanilla cake with a spoonful of lemon curd.
- Scones: Pair gluten free lemon scones with honey lemon curd or serve it alongside a batch of whole wheat strawberry rhubarb scones for extra flavor.

A Few Recipe Tips
- Use fresh lemon juice – Always use freshly squeezed lemon juice to make lemon curd, you will be able to taste the difference!
- Cook slowly – If the mixture cooks too quickly the eggs will scramble. So, cook the curd mixture slowly over a pot of simmering water so that it doesn’t cook too fast.
- Whisk constantly – While the lemon-egg mixture cooks, whisking it constantly will also keep the eggs from solidifying.
- Strain – As a final step, straining the cooked lemon curd will remove any possible lumps so you’ll have the smoothest texture.
- Cool completely – Make sure you fully cool the curd before using it in a recipe so that it sets properly. If you can, make the lemon curd a day in advance of when you wish to use it so that the fridge can help it thicken.

Storing Honey Lemon Curd
Place the cooled lemon curd in an airtight container, such as a glass jar with a tight-fitting lid, and store it in the fridge for up to 2 weeks. Or, transfer it to a freezer-safe container and keep it in the freezer for up to 1 year. Thaw the lemon curd completely in the fridge before using it.
More Fruit Preserve Recipes
Honey Lemon Curd
Ingredients
- 3 large eggs
- ½ cup honey
- ⅓ cup fresh lemon juice from 2-3 lemons – note: I do not like Meyer lemons for this recipe; I do not find them to be tart enough
- 4 tablespoons unsalted butter
Instructions
- In a stainless steel bowl placed over a saucepan of simmering water, whisk together the eggs, honey and lemon juice until blended.
- Cook, stirring constantly to prevent from curdling, until the mixture becomes thick, about 10 minutes. Remove from heat and immediately pour through a fine mesh strainer to remove any lumps.
- Cut the butter into small pieces and whisk into the mixture until the butter has melted. Let cool.
- The lemon curd will continue to thicken as it cools. Cover immediately (so a skin doesn’t form) and refrigerate for up to 2 weeks.
That was a very beautiful post. Thank you for reminding us not to take things for granted.
Well written and aching post….you always have a way with words. Hope this gets a lot of readers. Chin up as the post recommends.